Embroidered Clothes (Best Choice)
sweat got me glowing like Edward Cullen
whatup hooligans it's Jennifer whoa why
did I turn into an ASMR voice Channel
it's Jennifer and welcome back to Osos
so a couple of things I don't know if
you guys have noticed but I have been
away for a like over a month not to make
this about me because there are
definitely like way bigger issues in the
world going on right now but just to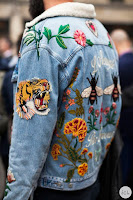

explain why I took my little break I
realized I was experiencing some pretty
bad burnout as well as some kind of
intense mental health issues which I've
never really like experienced to that
extent before so I kind just needed that
time to like relax by myself and like
cry everyday don't look at me I don't
like emotions so for me it was like very
coincidental timing that I was taking my
break and like isolating myself from
other people as well as being forced to
isolate so feel like right now is a
great time to do some self-reflecting
make some DIYs maybe embroider something
speaking of embroidering things today's
video is going to be another DIY
embroidery video but I feel like it's a
great quarantine hobby because it passes
a lot of time embroidery takes so long
and you can also do a while binging a
show or something cuz I I know you guys
are already doing that and another
reason is like a little bit more intense
but basically is the last time that I
filmed a DIY embroidery video in
November it was like one of the like
peak moments that I knew I needed to
take a break I'm gonna friggin start
crying I'm not gonna cry emotions are
not real there's social constructs
basically oh it's like crying throughout
filming the video like while I was
embroidering I'd be like sobbing
hysterically and I'd be like no it's
fine like just like keep going and now
they think back on it it's like really
intense so this video is like kind of
symbolic for me because I'm coming back
to this same concept look like a
different mindset obviously my problems
are very privileged problems so I don't
want to be insensitive but I just want
to like explain what happened to me I
guess at the same time I know everything
is like really really scary right now
for the whole world so I hope you guys
are doing okay um anyway today is
embroidery the love of my life this is
once again me
promoting my grandma hobbies I feel like
I'm already living the retirement
lifestyle at 21 years old but I kind of
love it today I'm gonna be doing three
different projects and they're going in
ascending order from easiest to most
difficult yeah well stick started I
think I'm gonna film that whole intro
again alright starting off with
materials obviously you're gonna need
some embroidery thread I have a bunch
here I ordered these all off of Amazon
it came with this whole kit of
embroidery essentials including the
thread the needles embroidery hoops that

kind of stuff so I'll link that kit down
below but if you can't access that right
now because of quarantine and shipping
issues you can also try just using some
regular thread if you have that you
might have to double it up or go over to
go over it or go up go oh my god or go
over it a couple times just to make it
thick enough but it should work it just
might take a little bit more time you're
also gonna need a needle and that's
pretty much it for essentials some other
optional tools that might help are a
seam ripper in case you mess up
embroidery hoops this just keeps the
fabric taut and also some fabric
stabilizer this helps you transfer
images and helps make your fabric stiff
alright that's it for materials so for
the first embroidery project I'm taking
my nude hoodie and I'm planning on doing
this mountain scenery type embroidery on
the top right corner so I'm just lightly
tracing out my mountain design in the
corner it's just to see approximately
where I would want my design to be then
I'm taking some black embroidery thread
and embroidery thread usually comes with
six individual threads twisted together
so I'm separating that into three groups
of two threads each usually I would
separate into two groups of three
threads but since I wanted this design
to be more detailed and have a thinner
line I went with two threads next I just
added my embroidery hoop to keep the
fabric tight and then I started
embroidering so obviously all mountains
have different shapes so I wasn't too
careful about making the lines really
smooth in fact I wanted them to be a bit
jagged to make it look a little bit more
realistic but essentially I just made
two
in Peaks and we all know what mountains
look like I used a reference photo but
you can just kind of see what I'm doing
here so don't worry about making it too
perfect

so the stitch that I'm using is kind of
a cross between back stitching and split
stitching I believe it's called for back
stitch I would sew a stitch and for the
next stitch
I pushed the needle back down where that
previous stitch ended for a split stitch
I would push the needle back down half
way from where the last stitch ended so
it kind of overlaps a bit so I would
kind of mix the two types of stitches
throughout the design depending on what
was needed whenever I did do a split
stitch I would only overlap maybe like a
fifth of the way of the stitch
I hope all that made sense not a
professional embroidery person over here
so as you can see I made two mountain
peaks and they kind of come together in
the middle I also did some snow on the
top by making some triangles and
diagonal lines
I added some contours on the mountains
this design actually is really really
easy because of the flexibility of it it
can be a little bit abstract there's no
strict rules about what mountains have
to look like
after that I wanted to embellish a
little bit so I added a little crescent
moon on top and I used shorter stitches
for this to make it look curved and then
I also added some stars just by doing
these little crosses I made some bigger
makes them smaller and it just adds
variation here is the final design I
really really like how it turned out and
it was really really simple to make so
would recommend trying it out
all right for the next project I am
taking this yellow t-shirt and I wanted
to embroider a B onto it save the bees
hehe so I just lightly sketched out the

B shape onto my shirt honestly I wish I
had done a more detailed job at
sketching it out first so that it didn't
look so wonky in the end but it is what
it is so I'm starting off with some
black embroidery thread that I split
into two groups of three strands each
I'm taking one of those three strands
and threading it on to the needle then I
started embroidering and I'm using the
same type of stitch as I did last time
so I'm starting out by just outlining
the entire thing and then filling in
later so I started with a circle for the
head
and then a slightly larger circle for
the midsection and then a long oval
shape for the bottom next I'm moving on
to the wings oh no next I'm moving on to
the limbs the legs if you will honestly
I wish I had done the legs a little bit
shorter because at the end I mean you'll
see what it looks like at the end but
anyway moving on to the wings I did kind
of like a trapezoidal oval shape and
then I just sewed these diagonal lines
within the wings then I did two more
legs on top and then the antennas and I
just repeated the exact same thing on
the other side so now I'm gonna start
filling the beat in I started out by
stitching some stripes on to the bottom
portion then I filled in the head with
just all black and then I went in with
some yellow embroidery thread and kind
of just filled in the rest so the middle
circle and then in between the black
stripes and that's pretty much it
honestly not my best work it low-key

looks like a mosquito
crust with a bee I think it's because
the legs are way too long like it just
looks like a massive mosquito be like I
don't know how else to explain it but
from far away it looks a decent just
like don't come too close but anyway I
think overall it was successful
Comments
Post a Comment